Showing posts with label stamps. Show all posts

Saturday, 16 October 2010

Copics Blog Candy


This is my entry for the Crafty Goings On Copics Blog Candy
Apologies to Karen for not being able to link properly when I posted before - Mr Blogger was playing up! so please disregard the first.


I used copics to colour the image when I was round at Maddys for a crafty session a while ago
I used Stickles clear rock candy around the ruffles of the dress


I used my nesties for the matting & the stamp was the free one from Craft Stamper magazine stamped onto the scalloped punched circle
I added a heart charm tied with ribbon and 3 buttons to finish.


Monday, 21 June 2010

Gosh I'm a Winner!

THANK YOU RACH!
Look what I've won! Rach's Blog Candy over at Papercrafts by Rach blog 
Aren't I just the luckiest girl! I'm thrilled to bits :-)

Just look at the lovely huge paper stack & the gorgeous blooms & crystal drops & the stamps are sooooo cute! I'm going to have a wonderful time playing with this new stash! :-)

So a huge thank you to the generous Rach - do go take a peek at her lovely blog ..........................

Wednesday, 24 February 2010

Serendipity square tutorial


This technique has been around for years but I hadn't got round to trying it. I had loads of scrap pieces of papers so decided to have a go .................................................


So firstly gather together your scraps of plain, patterned, textured papers anything goes ...
& in addition you will need :-
Backing paper - I used white 12 x 12 cardstock but any size or colour of your choice.
Glue - I used white craft glue but any glue that you are comfortable with
Stamps of your choice
Embellishments - eg. ribbon/fibres, embossing powders, punched shapes, mesh, glitter, foil, .............. the list goes on anything you fancy really


Start with your backing paper


Tear or cut the papers with plain or fancy edge scissors, variety helps the overall look, & stick down well with glue. It is important to make sure that the pieces are well stuck down or you will have problems at the end when you try to cut into the new paper you've made. Don't worry about overlapping the edges as you can trim later.


Keep on adding your random sized pieces ............................


Until the backing paper is covered.


Lastly go as wild or restrained as you like & add stamping & embellishments to the page.


These are the stamps I used.

Finally cut your paper into smaller squares/rectangles/circles & use them in your projects. You could also punch or die cut them I would imagaine - Let your inspiration flow .................

I'm off to play! :-)

Monday, 15 June 2009

Quick make


I've just done a quick acceptance to a 50th birthday party RSVP card this morning. I stamped the background using the Paper Artistry number stamp then used my distress inks on the background. Used punches for the Thank you sentiment which I again distress inked to tie in & stamped the image & tickets onto some bit's of 12 x 12 & cut out. Off to the post box now :-)

Wednesday, 6 May 2009

Copic Challenge 12

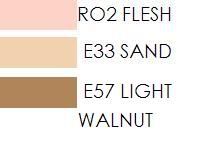
The colours this week for the Copics Challenge :-


Unfortunately with my limited amount of copics I don't have any of the named copics this week so have had to use as near as I can. The closest I have are R20, E31 & E35 and E47. Hope this is ok.


The birthday card is for my SIL (her birthday is on Saturday & I don't think that she peeks on here)


I used my new Martha Stewart punch - thanks Kath for getting that for me :-) & my new stamps - the fan & shoe that I got from my last visit to Lynne at the Craft Den Sheffield. I love them :-)


Sunday, 15 March 2009

DewDrop Craftz blog challenge card


Used the sketch for the Dewdrop Crafz blog challenge for this birthday card.


Friday, 13 February 2009

Craft Club makes


It was a free week at Sticky Fixers Craft Club yesterday and between the gabbing, biscuit eating & cuppa drinking I managed to make a couple of cards. The first on was for the Crafts by Carolyn card challenge What no red. A Valentines card without using the traditional red or pink. I layered the bird stamp after cutting it out & fixing with sticky fixers.


The second one was a Birthday card with an Oriental theme. I stamped the background paper with the oriental character stamp & then stamped the figure & sentiment on the pink paper cut out & inked the edges, fixing them to the card with sticky fixers - appropriate as I was at Sticky Fixers craft club :-)

Thursday, 29 January 2009

Decision made!


Yes I decided on a smaller project :-) In fact I decided to join in the challenge on the Object D'art challenge - this week - the book.


This is what I started with .....................................


And this is the end result ........................................ The paperback covers were reinforced with mountboard which I overlapped the actual cover size. They were then distressed & inked with distress inks & then stamped & embellished.


Spine view ............................................................. note I used some of the offcut paper from the inside to cover the spine & used distress inks.


And the inside. I hollowed it out & reinforced the edges with mountboard which I covered with inked paper from the cut out & again inked with distress inks.

Saturday, 17 January 2009

Susan came to play.....


Susan came to play today - we had fun - once we managed to get into my craft room!

I used my new alcohol ink to do another tin. I used brown Stazon to stamp the images. Love the vibrant colour :-)


We also made the tag using emossing powders & inks. Then we decided to join in with the Crafts by Carolyn challenge Pocket full of Posies. I used the Swiss dots cuttlebug folder & some square brads along with some of my new ribbon.


We had a lovely time & will have more fun later :-)

Wednesday, 14 January 2009

More stash


Just unpacked some more of my stash & found the camera - there seems to be a theme here! I seem to have brought back a few stamps :-) As well as a lot of gorgeous ribbon :-) Well it would have been rude not to!

Now I have to reorganise my craft room to fit everything in!

And of course have a play! :-)

Sunday, 7 December 2008

Xmas Cards


So I've managed to do a few Xmas cards - spurred on by starting the advent challenges on Crafts by Carolyn forum

this was a template challenge


This one multiplied!!!! Red Gold & Green challenge - all slightly different :-)

Friday, 21 November 2008

Object D'Art


This was my starting point for the Object D'Art challenge 'The Frame'


This was the finished frame. the photo is of my first car - a Mini (original type!!) I used old car keys & key fobs along with stamps to decorate the alcohol inked base. The Mini wording was die cut using Go Slim Sizzix coloured with whisper pens & highlighted with a silver pen. Metal glue came in useful in this project!


Loved creating this :-) Thanks Jennie for the challenge :-) It's amazing what sort of things you find have been kept isn't it!!

Thursday, 20 November 2008

Another card


A birthday card this time. Again using the velum paprer as a background - added some lace & self adhesive ribbon & petals with a pearl brad in the centre. Used one of the elements of the stamp set I got from Creative Treasures which i inked & stamped in different colours.

Tuesday, 18 November 2008

Valentine Card


Yes I know it's not until next year but Nikki at Dewdrop Craftz has challenged us to make a Valentine card - no red & no flowers - so here is mine :-) all in golds & browns


I backed the card in patterned vellum in white - Ornate floral by Papermania & used double sided 12x12 foil paper Gold border for the rest. The swirl stamp is from the Basic Grey Birds of a feather set & words from the Dovecraft clear stamps & I used punches & inks & of course sticky fixers!

I enjoyed doing this so a big thank you to Nikki for the challenge :-)

Saturday, 11 October 2008

More Baby Cards

As promised when I was on holiday a couple more of the baby cards.


The pram is a stencil which I chalked the outline of & then cut it out & mounted it on baby sentiment paper which I matted on plain dark card.


This one is a sentiment stamp which I stamped onto pastel patterned paper which I then matted onto the plain green card. The circle & scalloped circle are punches & the bear was bought with a few other baby bits when I was in Oz.