Monday, 28 February 2011

3 Squares madness!


The challenge over on Less is More this week is 3 squares
This was my first card


I used a square 'background' stamp that I  inked with distress inks.
The 2 outside squares I used the stamp square on but for the middle square I tilted it making it a diamond shape which fitted the seahorse stamp beautifully.


The left hand square I stamped using the feebie stamp from Craft Stamper mag


and used this Happy Birthday stamp from Penny Black on the right hand square.


This is the second card...

I had stamped out a practice before stamping straight onto the card for the last card
and not wanting to waste .....
cut out the practice stamping  & stamped just using the images this time.


note that I popped one of the images 'upside down' for added interest.


I mounted them onto a piece of silver 'netting'


and to finish stamped the Happy Birthday sentiment
straight onto the card.

My 3rd card in the 3 squares madness series


is this one for hubby's Aunties birthday ............


The first square is a beautiful yellow mulberry paper which was a present from a friend over in Japan
it's so fresh & spring like


The image is a Penny Black stamp, coloured with my copics
The border was done with a copic  0.8 outline pen.

So there you have it .............. my 3 squares madness!! :-)

Thursday, 24 February 2011

The White Stuff


is the theme for the challenge over on CHNC this week
I opted for the mostly white card & used an embossing folder snowflakes for the textured background


finished it with the Happy Christmas sentiment stamped onto red vellum, mounted on white card & popped on top of the red ribbon.


Christening card


There is a Christening in the family coming up - over in Australia so unfortunately I won't be there ....

This is the card that I've made for the occasion. 


The cross was cut freehand from glittered silver card


I used the glittered card to matt the sentiments


using the same 12x12 paper throughout the card


Love these cute little hands stamp :-)
Wednesday, 23 February 2011

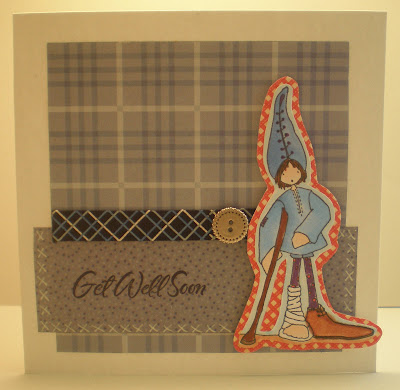
Get Well Soon card


A builder friend has had an accident - falling off a roof!!
2 broken ankles, broken pelvis & broken thumb!
He is in hospital so a Get Well card was needed ...


I have this appropriate cute Whiff of Joy stamp
which I coloured with my copics
cut out & mounted it on the orange check paper
and added a silver button


I added the ribbon, stamped the sentiment straight onto the card
and used my white gel pen for the faux cross stitch
and mounted on the blue checked backing paper.

Get Well soon Dan!


I'd like to enter this into the Totally Gorgeous blog challenge - check it out


Forgot to say that I used the sketch provided by Efemera over on UK Stampers


Saturday, 19 February 2011

Everyone is moving!


Lots of people in my circle seem to be moving .....
so here is another New Home card
Still have another one to make!


I stamped the image & then coloured it with my copics.
then matted the image onto the background pretty 12x12 paper which was matted onto the plain bazil card


I heat embossed the die cut key
and popped it onto the side of the card.
And voila - the New Home card :-)

Thursday, 17 February 2011

Feature a Creature


Over on Hazel's Xmas challenge blog the theme this week is 
'feature a creature'
I chose these cute mice carol singing :-) from my Penny Black set


which I coloured using my copics
matted onto plain & coloured card


snowflakes at the top (cut with my sizzix die on my Big Shot)


and at the bottom too
both lots coloured with platinum coloured ink


added the Merry Christmas sentiment this time stamped onto the patterned paper & matted onto the plain.

I'd like to enter this into the


as well as

Using a recipe ......


I'm getting ahead & have started making Mothers Day cards ........
This one is using the recipe that Sue provided over on Crafts by Carolyn forum.
A butterfly, a circle & a gem.


I used my nestibilities, the scalloped circle to cut & emboss the circle
then I stamped in the middle
& mounted it onto the striped paper background.


The gem is the pearl in the middle of the flower. I also used my Martha Stewart punch for the leaves
and mounted the flower & leaves onto the ribbon.


The butterfly is punched out using my Martha Stewart punch & double layered & the top layer stickled with silver Stickles.


and to finish I stamped the Happy Mothers Day sentiment straight onto the card.

Wednesday, 16 February 2011

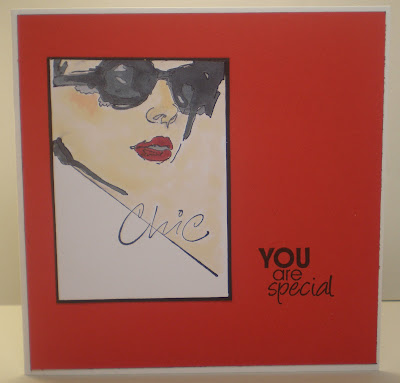
Chic birthday card


It's my friends birthday & I needed to make her a card.
This is what I came up with.
I'd not used this stamp before but thought that it was 'just her'
I coloured it with copics


and mounted the image onto black card


then stamped the 'You are special' sentiment straight onto the red backing paper ....................

I kept the whole look very simple ... to show off the stamp itself

Think that the result is very 'her' :-)

Tuesday, 15 February 2011

Challenge card


Thought it was about time that I entered some blog challenges again.
So here is my card that I'd like to enter for

Daring Card Makers - Reeling in the ribbon
sponsored by The Ribbon Reel

&

Cute Card Thursday - 151 Hearts & flowers


This shows the 2 different ribbons & the button element of the daring cardmakers recipe


and the hearts :-) & for Cute card Thursday too :-)


and the flowers for Cute card Thursday .....


Happy Birthday!


Quick New Home card


I needed a quick New Home card so this is what I came up with.
The green bazil is a really fresh green & complements the lovely mushroom paper


I stamped directly onto the bazil with my trusty home sentiment


and quickly coloured in the little house stamp with my copics.
I matted the picture & the mushroom paper onto plain card & layered them up &
there you have it .....
a quick New Home card :-)

Monday, 14 February 2011

Competition entry


I took a postcard & used my distress inks to 'age' it 
& then used one of my background writing stamps again using distress ink to make the background.


I then stamped the PaperArtsy figures
and the hearts


and the owl post stamp in the appropriate place...


and mounted it onto the background paper on the card.
Finished it off with the ribbon which I stamped directly onto with the Valentine sentiment
& added the brown pearls
and the all important heart for Valentine's Day :-)
The heart was again made from chipboard & heat embossed a technique that I was taught a few years ago at the craft club I belonged to...