Friday, 29 April 2011

Off Centre


Just managed to get my entry into the Less is More challenge 
photographed in time!

The challenge for this week is 'Off Centre'

It's been a hectic week this week & I managed to play whilst away in the Yorkshire Dales with my limited stash that I had with me.

I was going to play again at home as I wasn't totally happy with this attempt but time has run out on me & I've just been told that we are unexpectedly going away again this weekend - a last minute invite :-) which is lovely but leaves me no time to re do my card! & rather than not enter - this has to be it!


After stamping the elements I used my Copics to colour the image.


I left everything else & popped the appropriate colour button in place.
Not sure if it enhances or not .......

Wednesday, 27 April 2011

Inspired by Craft Stamper


This is the book cover that I made
inspired by the article in Craft Stamper's Jan 2011 edition
by Trish Latimer
To Die For


Trish suggested using not only the die cuts, but also the 'off cuts'
I inked them using various distress ink colours.


I cut out the birds from 12x12 paper & inked the edges then realised that more definition was required so went round it with a black pen.


I used a stamp for the sentiment which I repeated at various 
angles around the front of the book
& used the red yarn on the spine of the book
The swirl is the die cut piece as it is meant to be ...


The other decoration is this lovely lace material that I found, which I cut up & used the pieces from the brown piece of this gorgeous lace.


I think it all works well together to form a coherent whole.

Thanks Trish for the inspiration :-)

Monday, 25 April 2011

Easter

I haven't been blogging for the past few days 
as I've been away in the Yorkshire Dales with limited internet access.


Don't usually post non crafty pics 
but these are relevant to my crafty posts :-)
This is me on our walk - on this walk MIL & I collected
stash!!


from these guys ....


whilst walking to Castle Bolton
- if you get chance it's a great place to visit :-)

on the way we found these wonderful fungi


and this fantastic log
check out the gorgeous textures! :-)


This is the Easter card I made


inspired by the countryside we walked through
& using the bits of wool that we collected whilst walking through the fields which were full of spring lambs :-)
using the limited crafty stash that I had with me :-)


The wool made into sheep with the addition of legs (done with copics)


Managed to leave behind ALL of my Easter stamps so had to 
 freehand the sentiment


these are close-ups of the other card I made 
but I don't have the full view unfortunately as I was interrupted when taking them & didn't have chance to go back & photograph .......... 

Wednesday, 20 April 2011

Adventures with Acetate ........

What a fun time I've had with this!
& problem solving too!

Over at Less is More this week we are challenged to use Acetate on our cards.

I had a packet of Acetate sheets - unused! - so started to play

I had an idea of what I wanted to do & stamped out my image onto the acetate & started to colour with my Copics - it smeared & didn't dry
as you can see here


I solved my problem by stamping with permanent dye on one side & used my Copics to colour on the other side - problem solved!!
I found stamping larger quotes & stamps onto acetate is quite difficult - it took a few goes as it slipped on the acetate & SMUDGED!!
It took quite a few attempts to get a clear enough image - not enough pressure & it didn't stamp all the image - too much & it slipped & smudged!
I managed an acceptable image eventually!
Good job I had a pack of acetate to play with! LOL

I then wanted to try using my embossing folders on the acetate, something I hadn't done before & I loved the effect :-)

........................but then I had the problem of how to adhere the acetate without losing the effect 
& without the glue being very visible & spoiling the effect

After trying various methods I dusted off my trusty Xyron & tried that
& bingo!
It dulled down the look of the acetate slightly but this was much better than the obviousness of other methods that I tried.

So then I tried various combinations & now have to decide 
 again!! 
 which one I'm happiest with

so here you go folks (if you've made it so far!)


No 1


Close up of No 1


No 2


Close up of sentiment No 2


No 3


Close up No 3

Thursday, 14 April 2011

Xmas Circles


The challenge on CHNC this week is going round in circles
so this is my circles card

The background is the circle Merry Christmas paper


The center is a wreath stamp stamped onto green paper from the same stack & the berries coloured in with a red copic pen.
This was mounted onto the red circle 
& the Christmas Wishes highlighted with a gold pen, 
again on a circle - this time a Martha Stewart scalloped circle punch.


The circles were mounted over the gold ribbon to finish the card.

Wednesday, 13 April 2011

Making my mind up ...


or


The challenge over at Less is More this week is

One Layer Card with the SENTIMENT
as the focus of your creation.

I can't decide which placement I like best. Usually it just pops out at me, 
but not this time!


I just keep changing my mind!


So I'll just have to pick one as my entry!


Tuesday, 12 April 2011

Crafting in the garden...


I've been gardening again today - & even after a soak in the bath 
I'm struggling to move!!

Before the digging of the raised beds, resulting in 
the lack of movement now!! I made my craft project of the day

I just couldn't resist the crafting bug! LOL


The Scarecrow!!

I've called him Fred :-)


He has already scared our scaredy cat!!


& I have to admit to jumping a couple of times myself!! LOL

He is stuffed with straw & the hat is held on with one of Karen's (Charmed Cards & Crafts) hatpins 
- she has loads of other yummy goodies too :-)

I pinched the shirt from hubby - don't think he'll miss it
& the jeans were our lodgers that he was about to chuck in the bin!!
I'm all for recycling & they were far too big for me!:-)

So Hello to Fred the newest member of the family :-0

Lucky Me!


This is the giveaway prize that I won over on the Blooming Felt blog.
Aren't I a lucky girl!
A selection of gorgeous goodies Royal Wedding inspired.

Do go take a look at the lovely goodies for sale at Blooming Felt 
As well as felting supplies there are lovely buttons & ribbons, craft books & craft kits, accessories & tutorials ......

As for me I can't wait for my goodies to arrive so that I can play! :-)

Thank you Sarah.

Friday, 8 April 2011

Challenge 14


Gosh it's already Challenge 14 over on CHNC - over a quarter of the year gone already!
This weeks challenge is to use foliage & or flowers on your Xmas card
so I've used holly leaves.


I stamped the leaves out & then cut them out.
If I remember rightly this was a free stamp from a craft magazine 
that came in a set of 4
I stamped the background using Galaxy Gold ink &
used a gold liquid pen to highlight the veins
& added the buttons for 'berries' to give a bit more dimension.


I stamped the sentiment in green to match the leaves but in the photo it looks black!

A bit last minute again but I've made it in time for the deadline :-)

Monday, 4 April 2011

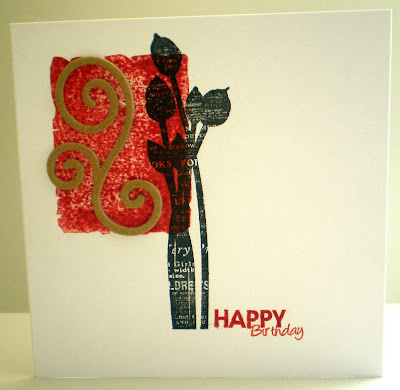
A Touch of Red


This weeks challenge on Less is More is A touch of Red
& here is my entry.


I used my background stamp with distress ink
& then stamped the flower motif from Paper Artsy in black


I stamped the Happy Birthday sentiment using the distress ink again
& finished with a die cut flourish.


Friday, 1 April 2011

Bookmark swap


Over on UK Stampers forum I've joined in with the bookmark swap.
We each made a bookmark to swap with another crafter.
This time we received & sent to different people.
Not many 'rules' to the swap, you could choose size, shape etc 
but you had to include stamping.
This is my bookmark.


I used double sided 12x12 paper for the base & surround
Then used torn paper from an old book, which I tinted with 
distress ink and then stamped using the ex libris stamp 
from the National Trust


I stamped the sentiment from Paper Artsy & added the Initial.


I used my Crop-o-dile to attach the eyelet 
& threaded through the ribbon to finish

Hope that the recipent likes it ...